Showing posts with label Wednesday's Walk-through. Show all posts

Wednesday's Walk-through {on a Tuesday} Katrina's Sisters Home

Today we are sharing Katrina's sisters home...

There are so many nice features, that is was hard to narrow it down, so we decided to throw a mixed bag in there for you to look at. If you have been reading Katrina's blog for a while, you may have seen some of these pictures before.

Katrina's sister, Amie, built this massive home about 12 months ago. It's an ongoing project for them as the house in on half an acre. Like Katrina, Amie is a project junkie so since these photo's were taken some bits have changed! I think we all need to rally together and get this house in a magazine! Who is with us on this one??


What a beautiful home. I particularly loved the kitchen.
Do you love white kitchens? Have a look at what was the most popular colour for kitchens on the Decorating Forum.

Only a few tickets left for the BHG Live show- first in is a winner.

Gorgeous Red Bedrooms!

Today we are featuring our lovely friend Mel again. She featured back here too. I had to quickly share this home with you one more time as she is moving out of it in a week! She is starting a new and exciting adventure.

Click on her blog here to follow her new journey... she is moving into a beach house!

In the meantime enjoy these pictures of the bedroom's in her house (and her love for the colour red!)....


Mel isn't the only one fond of using Red when decorating. Pop over to the Decorating Forum to see Katrina's addiction to Red.

A question to our readers: What do you want to see more of on our blog? Love to hear your thoughts!

Oh, and if you have something you would like to share with us, please email us...we would love you to feature on our blog.... after all it's not a blog about us, but about all of you!

Wednesday's Walk-through

This is an amazing house- and my neighbours. Yes I get to look out my window at this gorgeous house everyday. It is very unusual and maybe not everyone's taste but I do admire the effort the owners went to to create their dream home.


A striking exterior - their interpretation of a French Farmhouse.


The dining and kitchen.


The Media Room- very formal.


The Family Room - overlooking the Plunge Pool.


The Ensuite- with a Recollections Vanity.


One of the minor bedrooms.


Just in case you loved it - sorry it sold last weekend. So as we watched the neighbours visiting their new home this is what I was wondering.

Is this your cup of tea? What are your favourite parts of the house?

We would love to hear your thoughts:)

Wednesday's Walk-through

Today our friend and member from the Decorating Forum Kristie (Elements) shows us the house she and her Hubby finished renovating recently. Kristie has amazing taste and you can follow her latest project on her blog Elements At Home - a brand new home for their family. I have been lucky enough to visit Kristie's new home and the pictures don't do it justice- it is stunning.

This is her story about their renovation project.

Whilst building our dream home we decided to buy a property with the intention of renovating and selling. I had kept my eye on this area for at least a year prior, so I knew the market and what everything was worth. It did mean we had to tighten our belts so much my new hobby was how to sell as mush as possible on ebay to fund any new purchases. But we knew we could do up this property enough to make enough money to fund the fitout of our build.....with our fingers and toes crossed I researched
and bought for our budget reno while Hubby implemented the ideas every weekend.
We felt we would need to appeal to the general public especially 1st homebuyers...so this is what we did.
So we purchased for $410k, we spent $18k on paint, tiles, new cabinets in all the wet areas, new carpets, new blinds and curtains and painted the exterior............ and today it settled with a purchase price of $510k.
So in the past 14 months we have bought a property and done it up while we were building and we have now moved in and yes its time to wind down and relax for a little bit.......

The lounge before - in all it's glory.


The lounge after- bought into the new century.

The kitchen before.

The kitchen - what a difference.

The Master Bedroom before.

The Master Bedroom After

I think you will agree Kristie and her Hubby earned every cent- it is an amazing renovation.

Some more good news - Kristie is an Interior Designer. You can contact her for help with your home at stylishinteriors@iinet.net.au

Pop on over today to chat with Kristie and our other lovely members on the Decorating Forum.

Julie-Ann.


Wednesday's Walk-through

We have so mnay new readers, so I just wanted to say hello to you all. Welcome.
What is Wednesday's Walk-through? Well it's all about showcasing YOUR homes. Real homes. No trick photography. No fancy photoshop. We are getting back to basics. Afterall, it's the real people that read our blogs. So if you have something to share with us, don't be shy... we aren't looking for the the biggest, or the best!

Today we say hello to Jenny from The Five Year Project. She is doing a fantastic renovation to her home!
Here is what she says:

The five year project…

I am married with two boys aged 12 and 5. My background is in Information Technology (Operations and Account Management) but this year I am a stay at home mum. My youngest has just started school and I wanted to be around for the pickup and drop offs. This has allowed me to really focus on the renovations of our Queenslander which we believe to be around the 100 year old mark. It has beautiful dome decorative ceilings and plenty of potential…


We have been here just over two years now and I think we are tracking very well even if new plans are constantly being conjured up.

The room I would like to do a walk thru of is our bedroom makeover. This room was very dark and dreary when we first moved in, in fact almost spooky. It had mission brown panelling and lolly pink cornices and dome. The floor boards were bare (unpolished) and the windows covered in cobwebs.

Our first job was to remove the panelling and replace with plaster. There is plenty of panelling left in the house that we felt it could be removed rather than painted over in the bedroom.


Although unpainted as yet, the plaster gave the room a whole new vibe.

The most inconvenient part about it, was that we didn’t have any wardrobes during this whole phase and I had to purchase a couple of those clothes racks as a temporary basis. The house was a bit like a Chinese laundry…

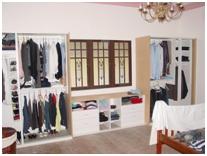
Finally, we had built-in wardrobes installed, making life a little easier for a while. The down side is that we had to paint the external wardrobe and doors (never again!)


This room is now complete including new curtains, home made bed head and new light for a bit of bling!

I try to have some piece of furniture in each room which tells a bit of a story or has some sentimental attachment. In this case I have my grandmothers’ dresser which I restored. My favourite part of the room is the dome ceiling.


 If you want to see more real homes and chat with real people, jump over to The Decorating Forum, follow us on twitter here and here or join us on Facebook.

Back Friday!


Wednesday's Walk-through

How is everyone this week? You have all been so quiet! Hope this freezing weather (if you are in the southern-southern hemisphere) is not ruining your moods. I am dreaming of Summer...

So today we have a little look at Melissa's idea for an empty wall. Clever chickie.
This is what she says:
"This wall used to be empty, adjacent to the kitchen. I got the cabinet, top and bottom for $40 total at an architectural salvage shop, painted, new top, new hardware and wa-la. We recently moved out of that house, and I never had time to put some big ol' turned table legs on either side of the open ends. I think that's all it needed."


Melissa has a cool blog called Raising the Rhyne Brine so pop over and say hi!

See you all on Friday!


Wednesday's Walk-through: A Powder Room

Welcome Michelle from The Yellow House. She has done an amazing transformation on her powder room. Please enjoy her before and after pictures....

This is what Michelle says:
The BEFORE.....
Last year I gave it a coat of brown paint that was leftover in the basement. It was a quick fix to cover the purple color it was when we moved in. I didn't want to replace the sink and toilet at that point so I went with the brown/blue theme. The floor is the worst part I think. It's vinyl and discolored.


The AFTER....
And here it is now.....

The sink was a craigslist find for $50....

Ever notice how the magazines rarely show the toilet? Well, it's a part of life and here is ours....

I'd like to find some antique brackets and put a shelf on the wall above it. I've been hesitant to hang much on the walls so far because of the wallpaper.
The old trim was standard stuff so we installed all new moulding and added crown. "We" meaning my hubby, you know the drill. ;)

The towel holder was found on Ebay and the soap dispenser is from Target.

Ruffle towel from Target and the holder was found on Etsy.

So that's the bathroom! We're so relieved it's done because we've begun other projects.

A few things we learned on this room:

~ Wallpapering a tiny space is more difficult than a large room.

~ Decorative plumbing parts are expensive. I wanted nice shut off valves with the cross handles since they would show behind the pedestal sink. The plumbing supply had beautiful ones in nickel but they would have cost $120. For $40 and some wonderful free advice we ended up with something just as nice. We purchased the shiny silver ones and used a Scotch-brite pad to create a nickel look. The scour pad worked wonders and now we have "nickel" shut offs for a fraction of the price.

~ It doesn't hurt to ask about display items. Our toilet paper holder was the last of the set so we were able to purchase it for $30. It retails for $146.

~ Be sure to measure carefully and not rely on the store employees to figure out what you will need. With both the wallpaper and the tile we had to order more after starting because it was underestimated. This ended up costing us more time and money.

Overall it was a really fun room to do!


Hope you loved seeing Michelle's room! I had to stop in my tracks when I saw this makeover. The colours are divine. Pop over and say hi to her and please make sure you visit her little boys bedroom!!!

AND don't forget to enter our giveaway: Wipe That Wine Smile Off Your Face. These are such a nifty product and really have more uses than just for wine! Chocolate or coffee stains too....


Related Posts with Thumbnails